💻
[React Native] Hook - useContext 설명 및 예제
On this page
❐ useContext란?
useContext는 depth가 깊은 하위컴포넌트와 데이터를 공유할 수 있는 Hook 입니다.
보통 상위 컴포넌트에서 하위 컴포넌트로 데이터를 전달할 때 props를 통해 인자로 넘깁니다.
하지만 개발하다보면 하위 컴포넌트의 하위 하위 하위컴포넌트로 데이터를 전달해야 할 수도 있고
오히려 반대로 하위 컴포넌트에서 상위 컴포넌트로 데이터를 전달해야 할 수도 있습니다.
이런 경우 props를 통해 데이터를 전달하기 어렵기 때문에 useContext를 통해 데이터를 공유합니다.
❐ 예시
예시 설명
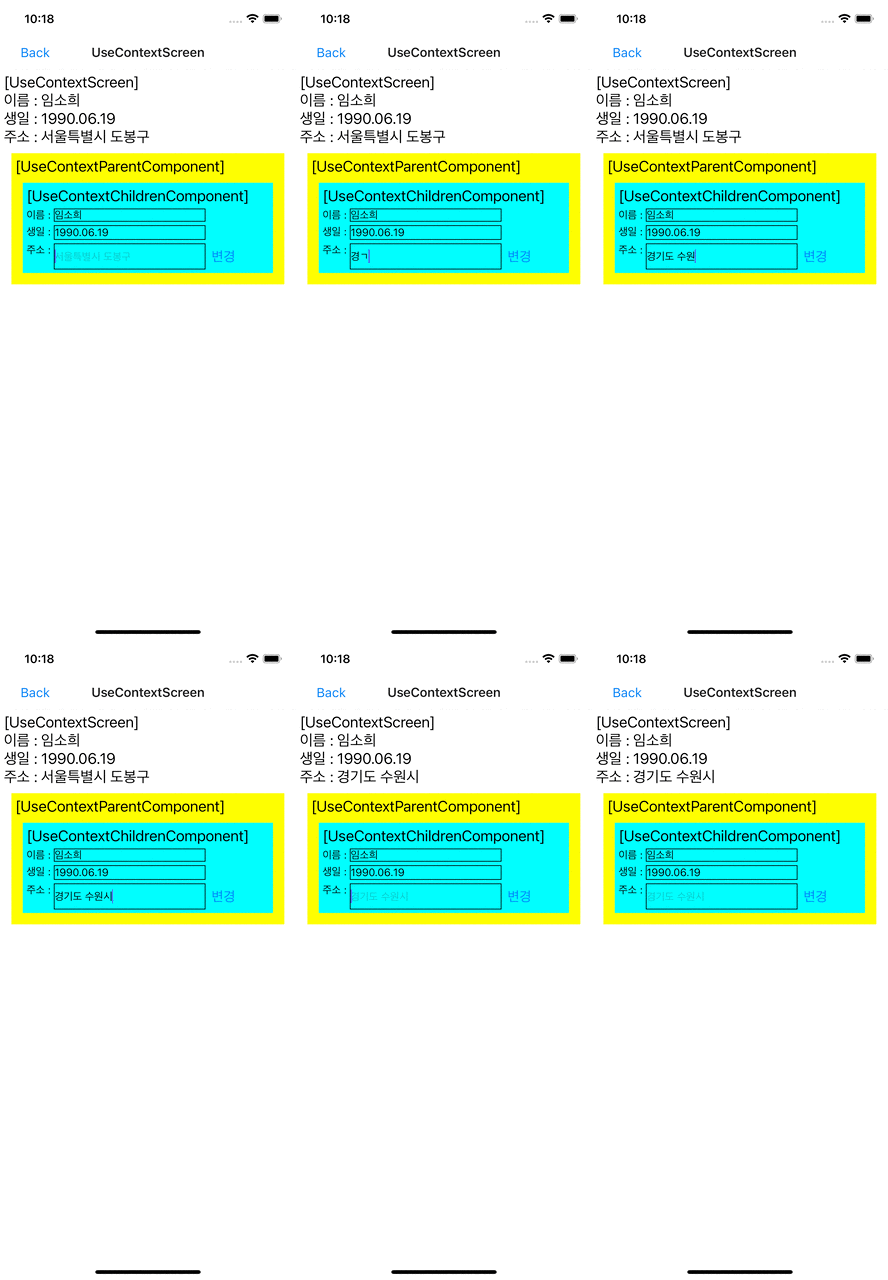
아래와 같은 구조의 하위 컴포넌트를 가지고 있는 화면을 구현하고, useContext를 사용하여 하위 컴포넌트와 데이터를 공유해봅시다.
UseContextScreen
ㅤㄴ UseContextParentComponent
ㅤㅤㄴ UseContextChildrenComponent
- 상위 컴포넌트(UseContextScreen)에서 데이터(userInfo) 정의
- useContext를 이용하여 하위 컴포넌트와 데이터(userInfo) 공유
- 하위 컴포넌트(UseContextChildrenComponent)에서 데이터(userInfo) 사용

예시 코드
UseContextScreen.js 파일 작성
javascriptimport React, { useState, createContext } from "react";import { StyleSheet, View, Text } from 'react-native';import UseContextParentComponent from "../component/UseContextParentComponent";//Context를 생성합니다.export const userInfoContext = createContext();const UseContextScreen = () => {const name = "임소희";const birthday = "1990.06.19";const [address, setAddress] = useState("서울특별시 도봉구");const userInfo = {name,birthday,address,setAddress}return (<userInfoContext.Provider value={userInfo}>{/*하위 컴포넌트에 userInfoContext에 저장된 데이터를 공유하기 위해 userInfoContext.Provider로 감싸고,userInfoContext에 userInfo 데이터를 저장하도록 valuse속성을 설정해줍니다.*/}<View style={styles.screen}><Text style={styles.text}>[UseContextScreen]</Text><Text style={styles.text}>이름 : {name}</Text><Text style={styles.text}>생일 : {birthday}</Text><Text style={styles.text}>주소 : {address}</Text><UseContextParentComponent/></View></userInfoContext.Provider>);};const styles = StyleSheet.create({screen: {flex: 1,backgroundColor: '#ffffff',padding: 5,},text: {fontSize: 20}})export default UseContextScreen
createContext() 를 이용하여 Context를 생성합니다.
export하는 이유는 다른 파일에서 접근할 수 있게 하기 위해서 입니다.
Context객체.Provider 를 이용하여 Context에 데이터를 저장합니다.
하위 컴포넌트를 Provider로 감싸면 하위 컴포넌트에서 Context에 저장된 데이터를 사용할 수 있습니다.
Provider는 하위 컴포넌트에 Context의 변화를 알리는 역할을 합니다.
하위 컴포넌트는 value가 변경될 때 리렌더링 됩니다.
UseContextParentComponent.js 파일 작성
javascriptimport React from "react";import { StyleSheet, View, Text } from 'react-native';import UseContextChildrenComponent from "../component/UseContextChildrenComponent";function UseContextParentComponent() {return (<View style={styles.screen}><Text style={styles.text}>[UseContextParentComponent]</Text><UseContextChildrenComponent/></View>);}const styles = StyleSheet.create({screen: {margin: 10,padding: 5,backgroundColor: '#ffff00',},text: {fontSize: 20}})export default UseContextParentComponent
UseContextChildrenComponent.js 파일 작성
javascriptimport React, { useState, useContext } from "react";import { StyleSheet, View, Text, Button, TextInput } from 'react-native';import { userInfoContext } from "../screen/UseContextScreen";function UseContextChildrenComponent() {const { name, birthday, address, setAddress } = useContext(userInfoContext);const [addressInputText, setAddressInputText] = useState("");return (<View style={styles.component}><Text style={styles.text}>[UseContextChildrenComponent]</Text><View style={styles.view}><Text>이름 : </Text><Text style={styles.input}>{name}</Text></View><View style={styles.view}><Text>생일 : </Text><Text style={styles.input}>{birthday}</Text></View><View style={styles.view}><Text>주소 : </Text><TextInputstyle={styles.input}placeholder={address}value={addressInputText}onChangeText={setAddressInputText}/><Buttontitle="변경"onPress={()=>{setAddress(addressInputText);setAddressInputText("");}}/></View></View>);}const styles = StyleSheet.create({component: {margin: 10,padding: 5,backgroundColor: '#00ffff',},view: {flexDirection: 'row',marginTop: 5},text: {fontSize: 20},input: {width: 200,borderWidth: 1},})export default UseContextChildrenComponent
useContext() 를 이용하여 Context에 저장한 데이터를 가져와 사용할 수 있습니다.